GPIO Project 9 - LCD Temperature
Beginner
30 Minuten
€167.09
In this project, you will learn how to use aDS18B20 temperature sensor to measure the ambient temperature and display this value on a16x2 LCD display with I2C interface. This is a great application to present data visually.
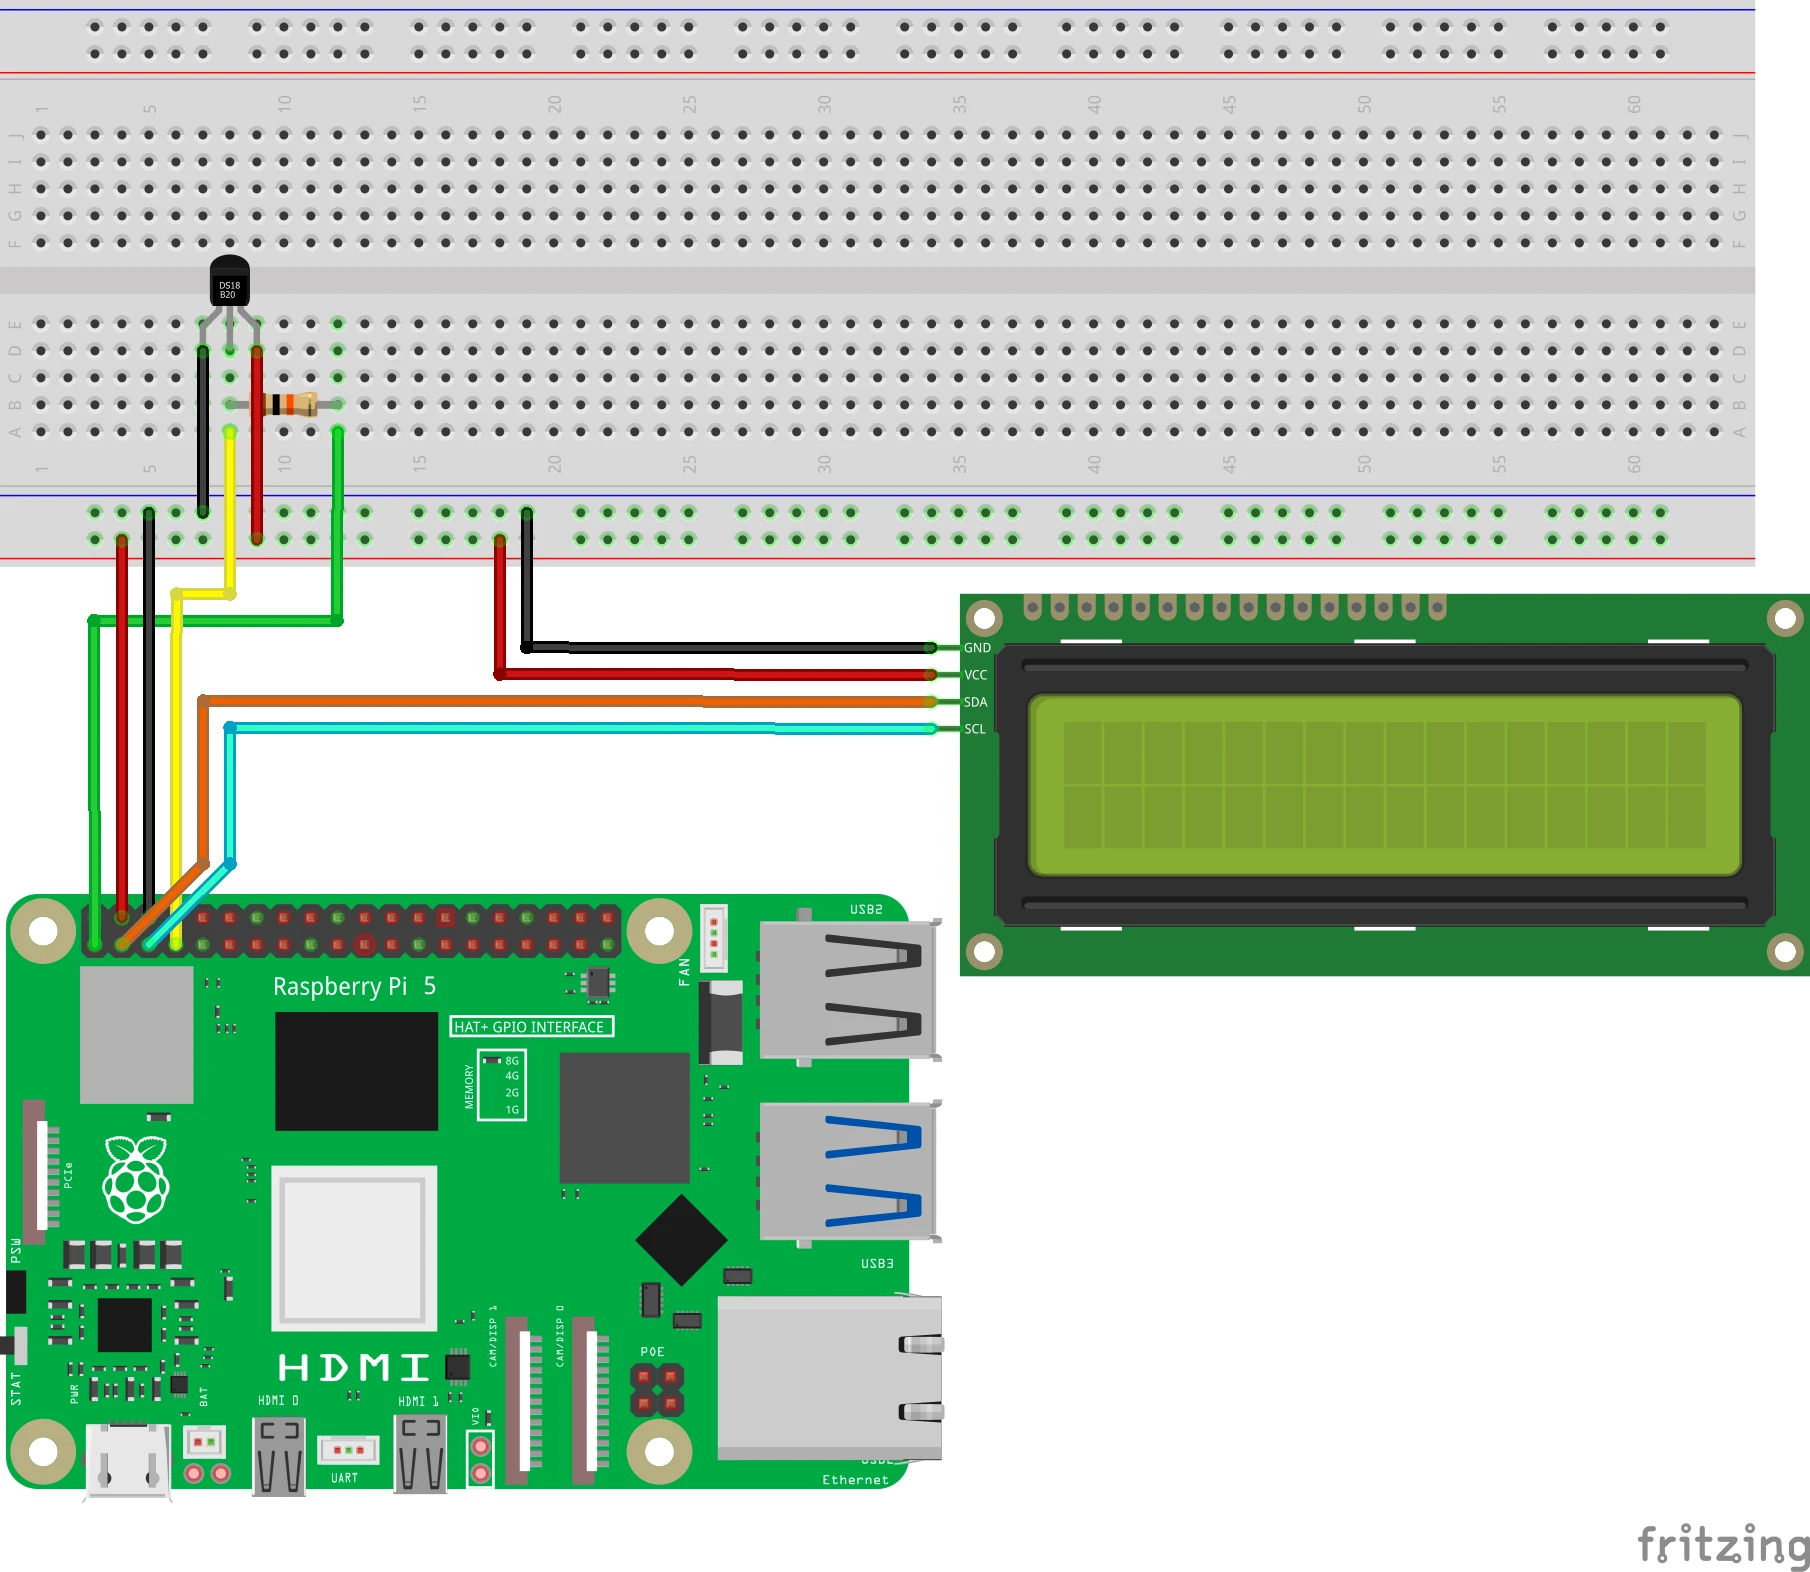
Connection diagram
Connection of the DS18B20 temperature sensor:
- Zwart draad: Connect with GND (pin 6).
- Rood wire: Connection with 3.3V (pin 1).
- Geel draad:
- Connect with GPIO 4 (pin 7).
- Plaats a 10kΩ weerstand tussen de gele draad en 3.3V ( pin 1).
Connect het LCD display:
- VCC: Connection with 5V (pin 2).
- GND: Connect with GND (pin 6).
- SDA: Connect with GPIO 2 (pin 3).
- SCL: Connection with GPIO 3 (pin 5).
Pinout Reference
GPIO | Pin # | Function | Connection |
| GPIO 4 | Pin 7 | Temperature sensor data | DS18B20-yellow wire |
| GPIO 2 | Pin 3 | I2C SDA | LCD SDA |
| GPIO 3 | Pin 5 | I2C SCL | LCD SCL |
| 3.3V | Pin 1 | Nutrition | DS18B20-red wire |
| 5V | Pin 2 | Nutrition | LCD VCC |
| GND | Pin 6 | Earth (Ground) | DS18B20 and LCD |
Preparation
Step 1: Install required libraries
Run the following commands in the terminal to install the libraries for the DS18B20 and LCD:
sudo apt-get update
sudo apt-get install python3-pip
pip3 install RPLCD
Activate the 1-Wire interface for the DS18B20:
- Open the configuration menu:
sudo raspi-config- Go to Interface Options > 1-Wire and turn it on.
- Reboot the Raspberry Pi.
Check if the DS18B20 is recognized:
ls /sys/bus/w1/devices/You would see an address like 28-XXXXXXXXXXXX.
Python-code in Thonny
Step 1: Write your code
Open the Thonny Python IDE and enter the following code:
import os
import glob
from time import sleep
from RPLCD.i2c import CharLCD

# DS18B20-instellingen
base_dir = '/sys/bus/w1/devices/'
device_folder = glob.glob(base_dir + '28*')[0]
device_file = device_folder + '/w1_slave'

# LCD-instellingen
lcd = CharLCD(i2c_expander='PCF8574', address=0x27, cols=16, rows=2)

def read_temp_raw():
    """Lees ruwe data van de DS18B20."""
    with open(device_file, 'r') as f:
        lines = f.readlines()
    return lines

def read_temp():
    """Verwerk de data en retourneer de temperatuur in graden Celsius."""
    lines = read_temp_raw()
    while lines[0].strip()[-3:] != 'YES':
        sleep(0.2)
        lines = read_temp_raw()
    equals_pos = lines[1].find('t=')
    if equals_pos != -1:
        temp_string = lines[1][equals_pos + 2:]
        temp_c = float(temp_string) / 1000.0
        return temp_c

try:
    while True:
        temp = read_temp()
        print(f"Temperatuur: {temp:.1f} °C")

        # Toon de temperatuur op het LCD
        lcd.clear()
        lcd.write_string("Temp: {:.1f} C".format(temp))

        sleep(2)

except KeyboardInterrupt:
    print("\nProgramma gestopt.")
    lcd.clear()
Step 2: Save the file
Click File > Save As and name the file lcd_temperature.py.
Step 3: Run the script
Click the greenRun button (▶) at the top the Thonny interface.
How does it work?
- DS18B20 Temperature Sensor:
- Reads the temperature via 1-Wire protocol and returns the value in degrees Celsius.
- LCD Display:
- Displays the temperature value on a 16x2 LCD display.
- Repeat:
- The program reads and displays the temperature every 2 seconds.
Result
- The ambient temperature is continuously read by the DS18B20 and displayed on the LCD screen.
- The temperature is also displayed in the terminal.
Experimenting
- Add Fahrenheit:
- Add code to display Fahrenheit as well:
python
Copy code
- Add code to display Fahrenheit as well:
- Add LED:
- Turn on an LED when the temperature exceeds a threshold.
- Logging:
- Log the temperature to a file for further analysis:
with open("temp_log.txt", "a") as log:
    log.write(f"{temp:.1f} °C\n")