4.7 avg.
5428+ reviews5428+ reviews
Order by 16:00 for same day shipping
14 days return
DE
EN
Individual
Business
GPIO Project 3 - Traffic Light
Beginner
30 Minuten
137,14
In this project you will learn how to use multiple LEDs to simulate a traffic light. Each LED is controlled via a separate GPIO pin, and you program the logic of a traffic light.
Connection diagram
- Connect the red LED:
- Long leg (anode): Connect this to GPIO 17 (pin 11).
- Short leg (katode): Connect this toGND (ground) via a jumper wire .
- Connect the yellow LED:
- Long leg (anode): Connect this to GPIO 27 (pin 13).
- Short leg (cathode): Connect this toGND (ground) using a jumper wire.
- Connect the green LED:
- Long leg (anode): Connect this with GPIO 22 (pin 15).
- Short leg (cathode): Connect this toGND with a jumper wire.
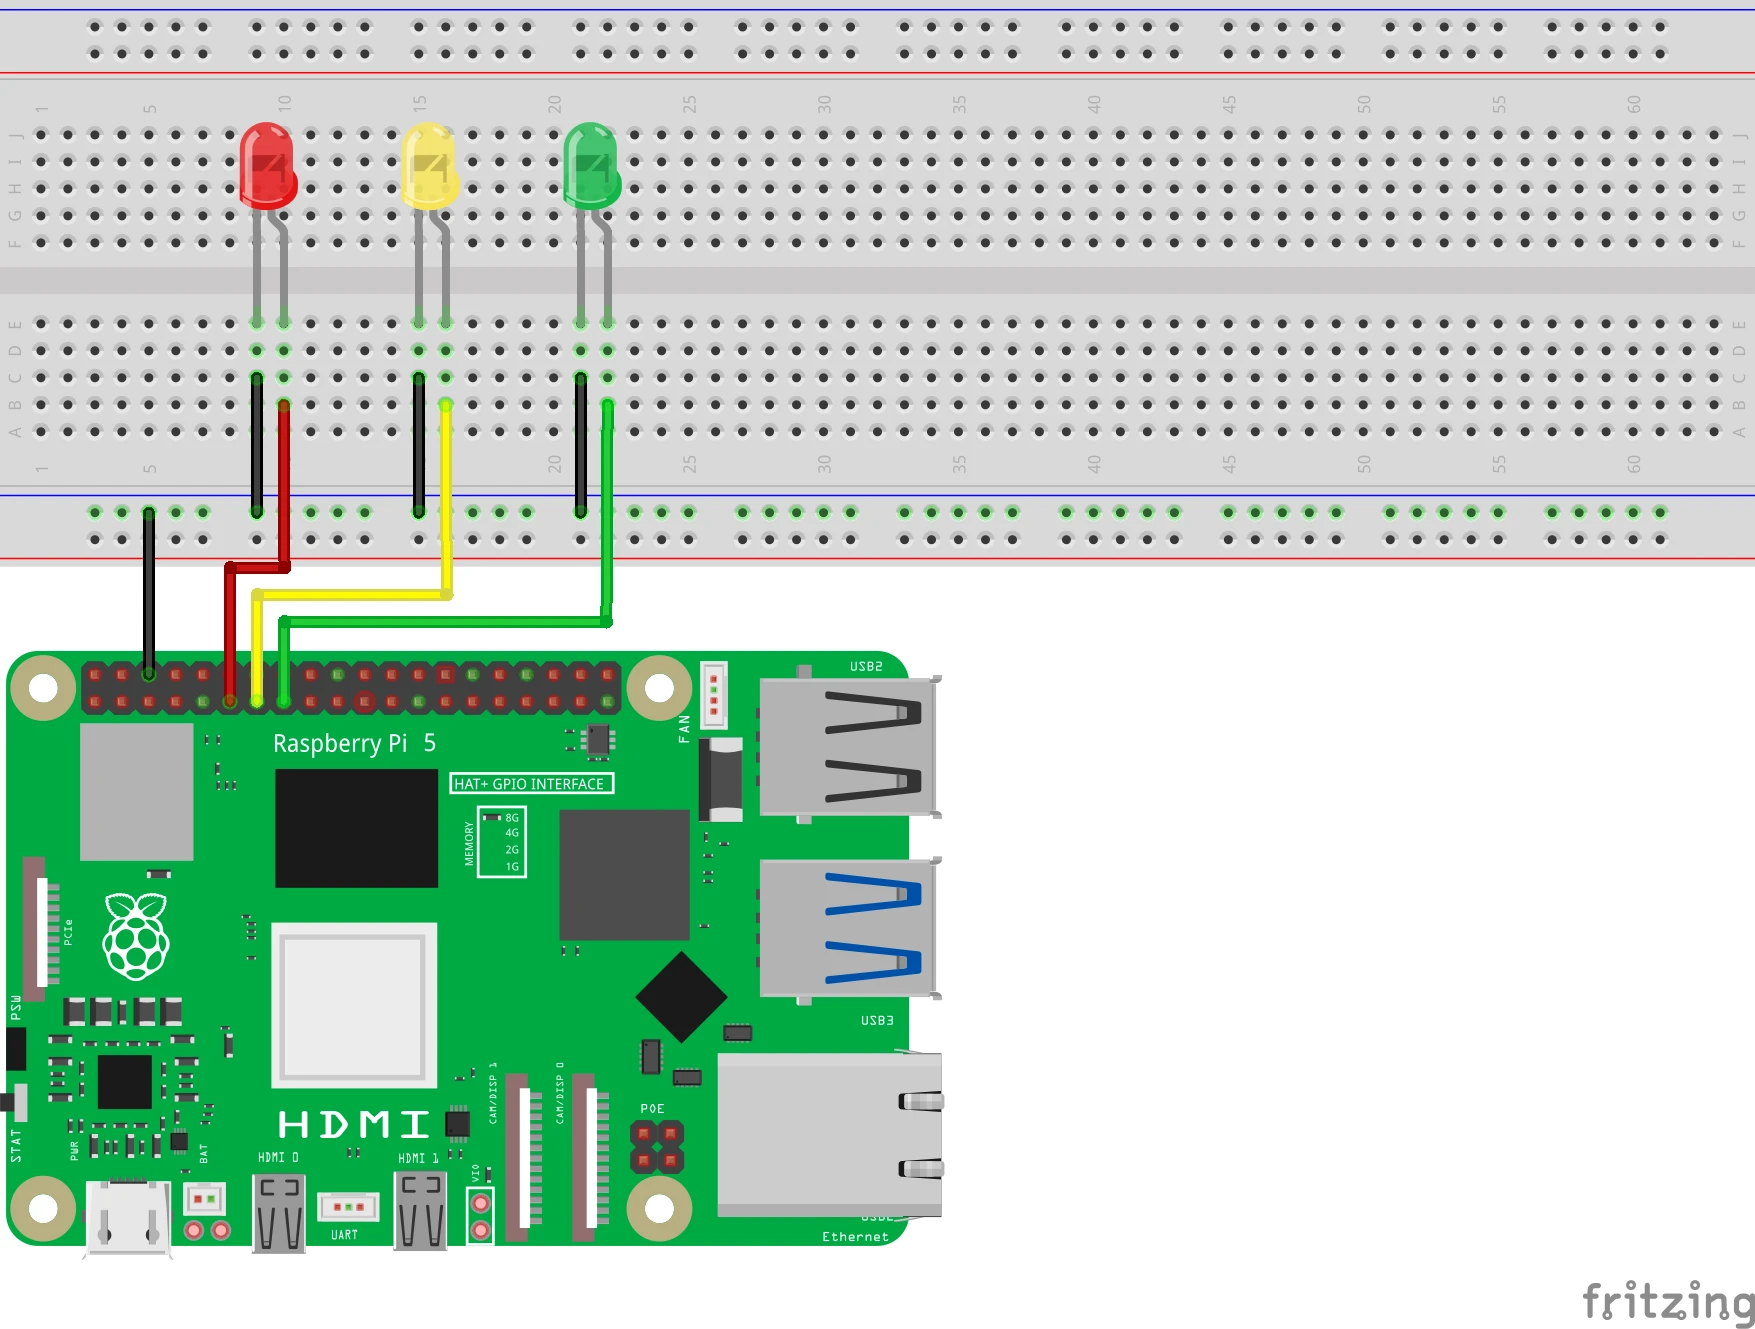
Pinout Reference
GPIO | Pin # | LED color | Function |
| GPIO 17 | Pin 11 | Red | Control red LED |
| GPIO 27 | Pin 13 | Yellow | Control yellow LED |
| GPIO 22 | Pin 15 | Green | Control green LED |
| GND | Pin 6 | All LEDs | Earth/ground connection |
Python-Code in Thonny
- Start Thonny: Click on the Raspberry Pi menu > Programming > Thonny Python IDE.
- Write your code: Create a new file in Thonny and enter the following code:
from gpiozero import LED
from time import sleep

# LED's koppelen aan GPIO-pinnen
red = LED(17)    # Rode LED op GPIO 17
yellow = LED(27) # Gele LED op GPIO 27
green = LED(22)  # Groene LED op GPIO 22

# Verkeerslicht simulatie
while True:
    # Rood licht
    red.on()
    yellow.off()
    green.off()
    sleep(3)

    # Rood en geel samen (overgang)
    red.on()
    yellow.on()
    green.off()
    sleep(1)

    # Groen licht
    red.off()
    yellow.off()
    green.on()
    sleep(3)

    # Geel knipperend (waarschuwing)
    red.off()
    yellow.on()
    green.off()
    sleep(1)
    yellow.off()
    sleep(1)
- Save the file: Click on File > Save As and name the file traffic_light.py.
- Run the script: Click on the green Run button (▶) at the top of the Thonny interface.
How does it work?
- red.on(), yellow.on() , green.on(): Controls the respective LEDs to flash.
- sleep(x): Pauses the program for x seconds between actions.
- Order:
- Red light stays on (stop).
- Red and yellow light up together (preparation).
- Green light turns on (driving).
- Yellow light flashes (warning).< /span>
Result
If everything is connected correctly and the script is executed correctly, the traffic light will mimic the standard sequence of red, yellow, green.
Experimenting
- Adjust Timing: Change the values of sleep(x) to change the duration of each light.
- Multiple Traffic Lights: Add a second set of LEDs to simulate multiple traffic lights.