GPIO Project 10 - IR Project
Beginner
30 Minuten
€167.09
In this project you will learn how to use an infrared (IR) receiver and a remote control to trigger actions on a Raspberry Pi . We will use an LED as output (which you can find in the GPIO kit ) which is controlled by specific buttons on the remote control.
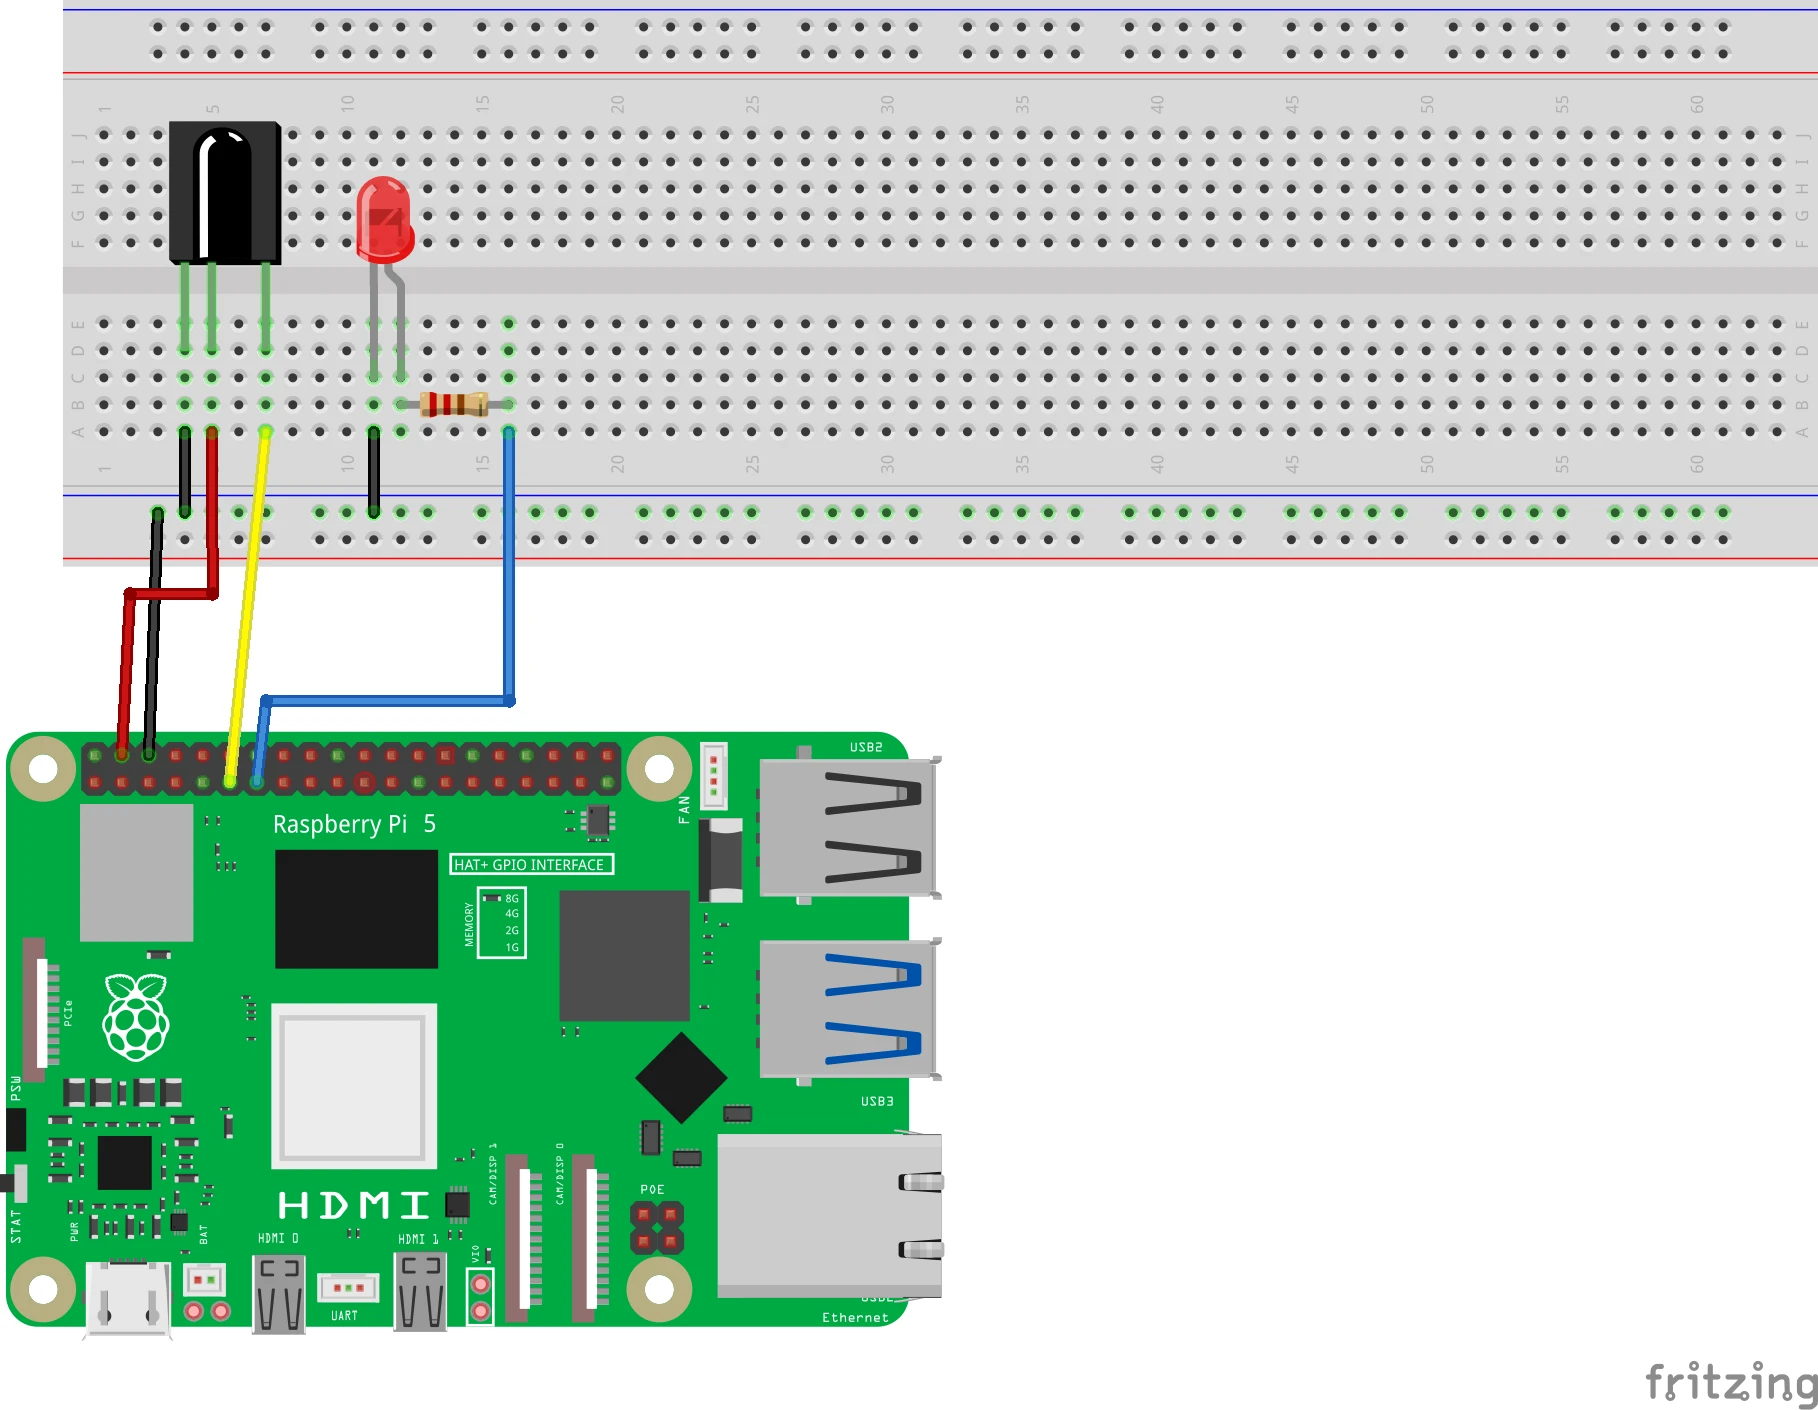
Connection diagram
Connect the IR sensor:
- VCC (or +) : Connect to 3.3V (pin 1) .
- GND (or -) : Connect to GND (pin 6) .
- OUT : Connect to GPIO 17 (pin 11) .
Connect the LED:
- Long leg (anode) :
- Connect via a 220Ω resistor to GPIO 27 (pin 13) .
- Short leg (cathode) :
- Connect to GND (pin 6) .
Pinout Reference
GPIO | Pin # | Function | Connection |
| GPIO 17 | Pin 11 | Input | IR sensor (OUT) |
| GPIO 27 | Pin 13 | Output | LED |
| 3.3V | Pin 1 | Power supply | IR sensor (VCC) |
| GND | Pin 6 | Earth (Ground) | IR sensor and LED |
Preparation
Step 1: Install required packages
Open a terminal and run the following commands to install the required IR library:
sudo apt-get update
sudo apt-get install lirc
Step 2: Activate the IR function
- Open the configuration menu:
sudo raspi-config2. Go to Interface Options > Enable IR and turn it on.
3. Reboot the Raspberry Pi .
Python code in Thonny
Step 1: Write your code
Open the Thonny Python IDE and enter the following code:
import RPi.GPIO as GPIO
from time import sleep

# GPIO-instellingen
IR_SENSOR_PIN = 17
LED_PIN = 27

GPIO.setmode(GPIO.BCM)
GPIO.setup(IR_SENSOR_PIN, GPIO.IN)  # IR-sensor als input
GPIO.setup(LED_PIN, GPIO.OUT)      # LED als output

try:
    print("Druk op een knop op de afstandsbediening...")
    while True:
        if GPIO.input(IR_SENSOR_PIN) == GPIO.LOW:  # Detectie van een signaal
            print("IR-signaal ontvangen!")
            GPIO.output(LED_PIN, GPIO.HIGH)  # Zet LED aan
            sleep(1)                         # Houd LED 1 seconde aan
            GPIO.output(LED_PIN, GPIO.LOW)   # Zet LED uit
        else:
            GPIO.output(LED_PIN, GPIO.LOW)   # Houd LED uit als geen signaal

except KeyboardInterrupt:
    print("\nProgramma gestopt.")
finally:
    GPIO.cleanup()  # Reset de GPIO-instellingen
Step 2: Save the file
Click File > Save As and name the file ir_project.py .
Step 3: Run the script
Click the green Run button (▶) at the top of the Thonny interface.
How does it work?
- IR sensor:
- Receives the infrared signal from the remote control.
- When a button is pressed, the sensor sends a signal to GPIO 17.
- LED:
- The LED turns on as soon as the IR sensor receives a signal.
- Repetition:
- The program continuously checks whether a signal is coming from the remote control.
Result
- Button pressed : The LED turns on for 1 second and then turns off.
- No button pressed : The LED remains off.
Experimenting
- Recognize different buttons:
- Add a library like lirc or pylirc to detect specific buttons and associate different actions.
- More output devices:
- Use multiple LEDs or other devices, such as a buzzer, to respond to different buttons.
- Log button codes:
- Log the received IR codes to identify specific buttons on the remote control.