Raspberry Pi project: Flappy Witch
In this project I will explain to you step by step how to make a Flappy Bird game in Scratch.
About Flappy Bird:
The inspiration for this project comes from the game Flappy Bird. The game was released in 2013 for the mobile phone.
The game is about a bird that is constantly falling, you can let it fly by tapping on the screen. You have to guide the bird through the obstacles by tapping. It is not allowed to touch the obstacles. In the meantime, the score is kept. The goal of the game is to get the highest score possible.
This game became a huge craze. Since the game was removed from the Playstore, many replicas have been made. This is one of them!
What is Scratch?
Scratch is a programming program on your Raspberry Pi . In this program you work with function blocks. This means that you do not write the programming text yourself. The blocks with the functions have already been made for you. You put these blocks in a diagram yourself. If you have downloaded the Raspbian software on your Raspberry Pi Scratch should be automatically on your Pi. If not, you must download it.
I program in Scratch on the Raspberry Pi 4 with 4GB. You can also program on the Raspberry Pi 3B+. You can also use the 1 GB or 2 GB with the Pi 4.
Are you programming in Scratch 2.0? Then you can still follow this tutorial. Keep in mind that certain functions may be in a different place. The images may also look different than on your screen. You can follow this tutorial because the code is the same.
Because this is a long instruction I have divided the explanation in subheadings. This makes it easier to find where you left off.
Change language.
Your program is probably in English. To follow the steps properly, it is wise to change the language in your program. You can change the language by clicking on the “globe” at the top left of your screen. This icon can be found next to the Scratch logo. Select Dutch.
Connect & Startup
On the side of the Raspberry Pi 4B are two Micro HDMI ports. Insert the Micro HDMI cable into the left port, and the HDMI end into a monitor or display.
Connect a keyboard & mouse to the USB ports and finally insert the power cable into the USB-C port.
Your setup is now ready to be booted.
When the Raspberry Pi starts up now you will see a desktop on your monitor. When you first start it up you still have to set it up, but that is explained step by step.
Programming
1. Program your Sprite
First we are going to create our Sprite. But what is a Sprite? A Sprite is seen in Scratch as a kind of character. An object in the background can also be called a Sprite, like a building for example.
- Boot your Raspberry Pi and click on the raspberry. Go to programming and start Scratch.
- When you start Scratch you will see that a default Sprite has already been created. You can keep this one. You can also create a new Sprite yourself, or choose one.
- Want to delete the default Sprite? Right click on the icon on the bottom left of your screen. And then click delete.
- To create a new Sprite you will see the text: “new sprite:” to create a Sprite yourself click on the brush. To choose a Sprite click on the head. For this tutorial I chose the witch.
- Change the name for your Sprite. To change the name, go to costumes. There you will see: “New costume:” Then fill in the name for the Sprite.
Now we can start with the code. First we are going to program our Sprite. In the game the Sprite falls down at a constant speed (gravity). You can keep the Sprite up by clicking on the screen.
- If you just edited your sprite, press Scrips. Now the function blocks will appear again. Go to events and grab the "when (flag) clicked" block.
- Go to controls and grab a repeat block. Put it under the start block. Then grab an “if then” block and put it in the repeat block.
- Then you go to observe. Grab the "mouse pressed?" function. You place this function between the if then.
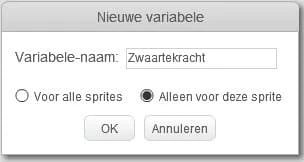
- Next we create gravity. Gravity causes the witch to fall vertically downwards, so the Y direction. We create a variable for gravity itself.
Click on data, then click on create a variable. Name it Gravity. Check: Only for this Sprite. This is important, otherwise it won't work. Then click OK (Figure 1).
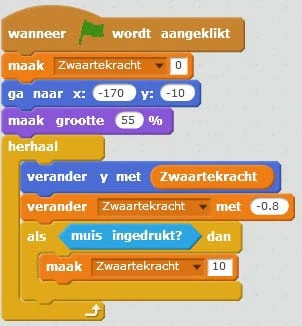
- Now grab the "make gravity 0" variable. Place it under the start function. Now gravity is always 0
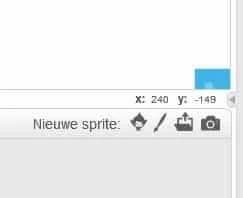
- Go to movement and place the “go to X:– Y:–” block under the create gravity. Place your Sprite where you want it to start when the game starts. Read the X and Y values and process them in your block. You will see these values on the left side of your screen. You will see your Sprite in a white box, in that box you can move the Sprite. If you move the mouse in the box you will see the values change. Play around with this a bit. If you enter the values in the function block and then press start, you will see where the Sprite is placed. Adjust these values until you are satisfied. You can always adjust it later.
- Now we're going to make the Sprite move up and down on the Y axis.
Go to movement and grab the “change Y by 10” block. Place it under the repeat block. Go to Data and replace the 10 with variables “Gravity”. Place “change gravity by 1” below it. Set the value to -0.8. The minus determines the direction your Sprite falls, in this case downwards. The number determines the speed. You can adjust these values to your own preference.
- Then place the make "gravity 0" block under the "mouse down?" function. Change the value to 10. Now your sprite will fall and jump back up the moment the mouse is down.
Your schematic will look something like this (Figure 2). For now, this is your Sprite code.
2. Create the obstacles
- You can create or choose the obstacles yourself. This is done in the same way as step 2 (Program your Sprite).
- Because we want obstacles at the top and bottom of the screen we create 2 images under the same piece. The Sprite that you are going to make now will come in 2 versions.
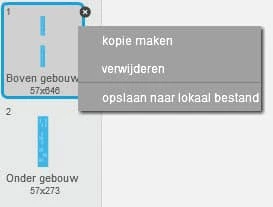
- Once you have chosen/created a Sprite, select it. Then go to Appearances. I have chosen the building, multiple versions of it have been created. If this is also the case for you, you can delete all other versions and keep your favorite. You can delete the other Sprite by pressing the cross.
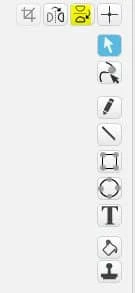
- Now we are going to create the 2nd version. Go to your Sprite icon (box under New Appearance). Click the right mouse button and press make copy. Now you have 2 times the same building. We are going to edit this 2nd version. At the very top right of your screen you will see different functions to rotate your Sprite. Press the top-bottom flip (Figure 3). Now we have a top and bottom for our obstacles. Don't forget to give them a name. I called them Top Building and Bottom Building.
Now we are going to create the code so that you can see both versions of your Sprite on the screen at the same time. Now click on your new Sprite and go to scripts. Now you can create a code that only applies to this Sprite.
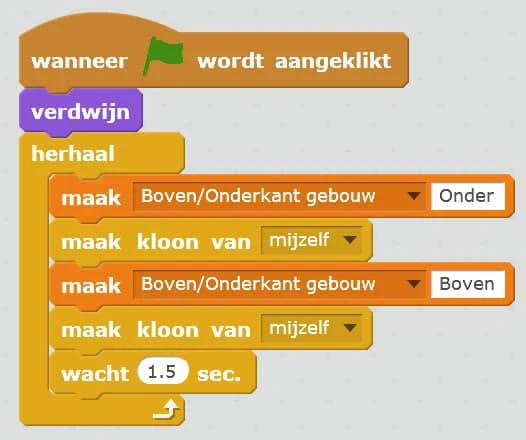
- Start the code with the same start function as the previous code. Go to Appearances and place a disappear block under the start. Go to Controls place a repeat block under this.
- Create a variable. Do this the same way as step 4 (Program your Sprite) I call this Top/Bottom Building. Again, this variable only applies to this Sprite.
- Place the “make Top/Bottom building 0” in the repeat block. Name the 0: Bottom.
- Go to controls and place a “make a clone of myself” place it below the previous create function.
- Copy the same 2 blocks from steps 7 and 8 and place them below each other.
- Name the other “top/bottom building” Top. Now buildings are also placed on the top. Go to control and place the “wait 1 sec” at the bottom of the repeat function. I set the timer to 1.5 sec. This determines the distance of the buildings.
- Your diagram should now look something like this (Figure 4).
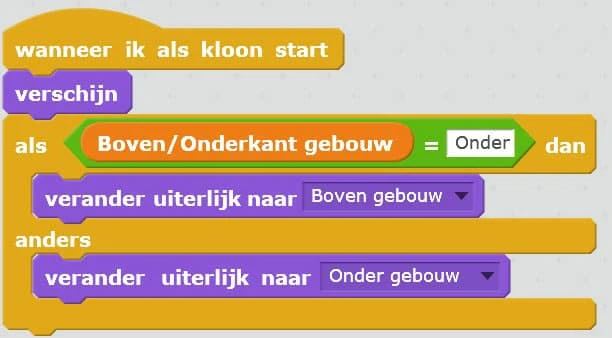
- Next to this we start another scheme. Go to Controls and place and "when as clone start" function. Get from looks an appearance block and place it under there.
- Go to Controls and place an “if — then else” block under the appear function.
- Go to functions and place an “equals” function between “if – then”. In the first equals gap, fill in your variable “Top /Bottom of building”. After the =, write Bottom. Note that the word is written the same as the diagram in (Figure 4).
- Go to Appearances and place under the as “change appearance to under building”.
- Copy this function and place it at other. Name building above.
If you have used a different name for your Sprites, you should take that over.
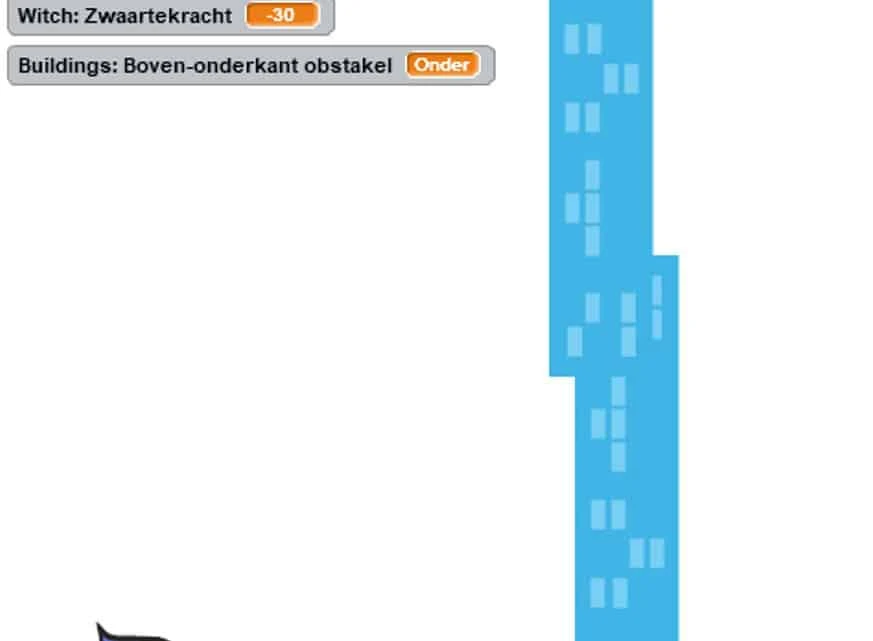
- Now we have made the code so that the top and bottom of your obstacle are visible on your screen at the same time (Figure 5). The position of the obstacles does not matter for now. The important thing is that they are both visible on your screen at the same time.
- Your code will look something like this (Figure 6).
3. Position the obstacles
The aim of the game is for the obstacles to move from right to left across the game. Therefore it is wise to start the buildings as far to the right as possible. You can adjust this yourself if you want to make the game a bit more difficult.
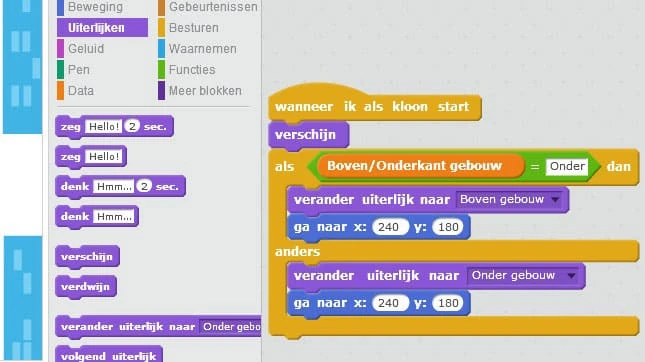
- Go to movement and place “go to X:– Y: — after” under the “change appearance to Above building.”
- When you move the mouse over the screen you will see the X and Y values in the corner of your white box. These change when you move the mouse.
- Play around with the values of X. If you fill in the value and press start you will see where it appears. Fill in the values that you are happy with. Don't see the obstacle? Click on your Sprite and go to the heading Appearances and click on Appear. If you click on this, you will see the obstacle. To determine which one you show, you have to click on appearance number 1 or 2 (which one you want to see).
- You want the obstacles to be on top of each other. Also place a “go to X: — Y:– after” function for the bottom. When you are happy with the position of the top you can fill in the X and Y values for the bottom. Now they are on top of each other. For clarification, see the picture (Figure 7). As you can see I have placed the buildings on the side of the screen. These are on top of each other.
4. Move the obstacles
Now let's move the obstacles on the screen
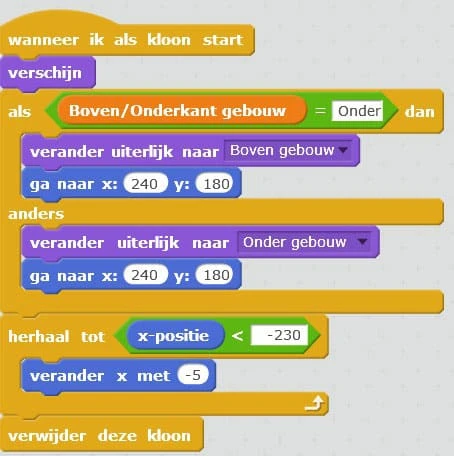
- Go to control and put the “repeat until” block after the if – then else block. This block checks if the condition is true or not. If the action is not true the program continues to the next block. If the action is true it plays the code in the repeat block.
- We also make the buildings disappear when they pass the sprite. Take a “less than” block from functions. And place it in the empty box after “repeat until”.
- Go to movement and grab the “X-position block”. Place it in front of the <50.
- To indicate when you want the building to disappear, place the mouse on the left side of the screen. Choose the position when you want it to disappear. Read the X value from this. Go to movement and place the “X-position” before <50. Place the X value after <50 when you want it to disappear. You can also move the obstacle to the side of your screen to make it easier for you (Figure 8).
- Go to controls and place the “remove clone” block after the “repeat until” function.
- Now let's move the buildings to the left. Go to movement and place a "change X by 10" block and place it in the "repeat until" block. Change the value from 10 to -5. This value determines the speed at which the buildings move to the left. You can adjust this yourself to make the game harder.
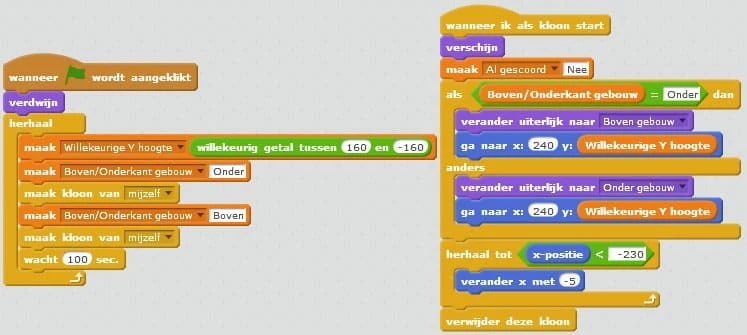
What you have written so far: the bottom and top buildings appear. The Position of these buildings are indicated. If the X value is less than (in my case) -230 the clone is deleted.
Your code will look something like this (Figure 9):
- Test for yourself whether the code works.
- You can adjust the waiting time yourself. This determines how many seconds a new building is placed.
Now we will change the height of the buildings by adjusting the Y position.
- We create a new variable. I'll call it for convenience: randomness Y height. This value is again only for this Sprite.
Then we create a random y position where the buildings are placed.
- In variables, place the create “random Y height” in the 1st programming block above in the repeat function.
- Go to functions and put “random number between 1 and 10” in the empty variable box.
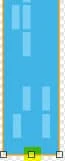
- It is helpful if the buildings are well centered to each other. Go to looks and copy a building and place it with the others as in the picture (Figure 10).


- To determine the center of the buildings, select both buildings with a square. Once you have done that, you will see a circle in the middle. Move this as close to the center of the box as possible. Move the buildings away from each other to determine the gap that your Sprite has to go through. If you are not completely satisfied with the distance between the buildings, you can adjust this later.
- Now duplicate what you just created. Right click on the image on the left side of your screen. Then click duplicate. See (Figure 11).
- Now that you have the same file twice, remove the bottom obstacle from one image. And from the other, the top. Now you have a top and bottom obstacle again, just like before. But now they are positioned next to each other.
- Adjust the names again.
- Now you should have a picture left that you can delete. Click the right mouse button and then delete.
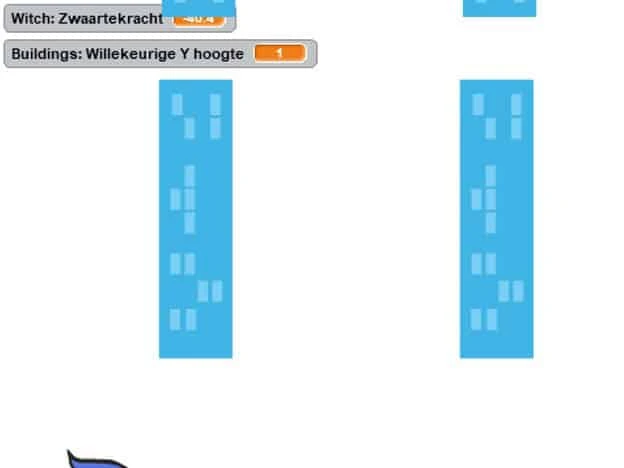
- Test your code as you can see my buildings are too short (Figure 12). If this is the case for you we will adjust this. Go back to suits and select your obstacle and all you have to do is stretch it a bit (Figure 13). This will make your obstacle longer and fit the entire screen.
- Back to the code: position the maximum/minimum height you want the obstacles to start at. Place it at the bottom/top of the screen and measure Y values. Fill these values in at “random number between”. The top is 160 for me and the bottom is -160.
- Still unclear where to place the obstacle? Take a look at this picture (Figure 14).
- Go to Data. Place the “random Y height” on the Y in the “go to X… Y… block. Place this for the top and bottom of the building. Your codes will look something like this (Figure 15).
- Test for yourself if the code works. You can still adjust the distance by changing the values in your code, play around with this a bit.
- You can also adjust the size of your Sprite: Click on your Sprite, so that the code is displayed. Go to costumes and choose make size 100% put it under your “go to x: y:” and above the repeat function. You can adjust it to your own wishes (Figure 16).
Do you find that your Sprite is too still while playing? Then we can add some kind of animation just like with the real flappy bird.
- Go to Controls and grab an “if then” block and place it at the bottom of the repeat block.
- Go to motion and choose the “point to 90 degrees”. You can adjust this however you want. I choose 75 degrees. Place this under the “make gravity 10 function”.
- Go to functions and grab a “less than” block and place it between the if – then
- Then we go to movement and choose the “direction” function, which we set for the <50.
- After the <50 we fill in 90. This stands for 90 degrees. 90 degrees was the starting position of the Sprite.
- So if the direction is less than 90 degrees we want the sprite to move clockwise. For this we go to motion and grab the turn (clockwise) 15 degrees. I adjust the 15 to 3 degrees. See for yourself what you like as a movement. Place this in the “if then” block.
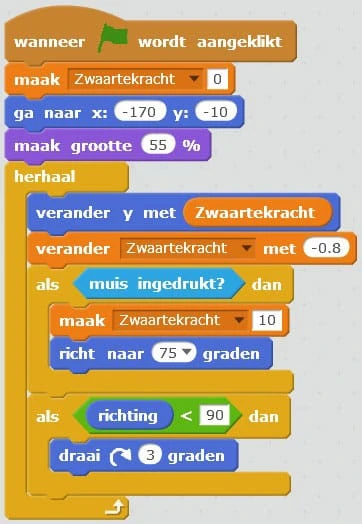
- Your code will look something like this (Figure 17).

5. Loss of function
Then of course we need to add a loss function. Go to the code of your character.
- Go to controls and place an if then block at the bottom of the repeat block.
- Go to observe and choose the "do I touch (variables)?" check your obstacle here. Because I chose buildings from Scratch I choose buildings. Place this block between if-then.
Go to control and grab the stop all block and put it in the “if then” block. What you have written now means that the entire code stops when the sprite touches the (in my case) buildings.
- Also, you lose the game if you fall too far down. Go to functions and grab an Or” block. Place the heading “do I touch —?” in the first opening of the or block. Then place the or block between if—then.
- For functions, take the less than block and place it after the or function.
- Go to movement and grab the Y position and put it in front of the <.
- Place the Sprite to the bottom of the screen and measure the Y value. I measure Y value – 170.
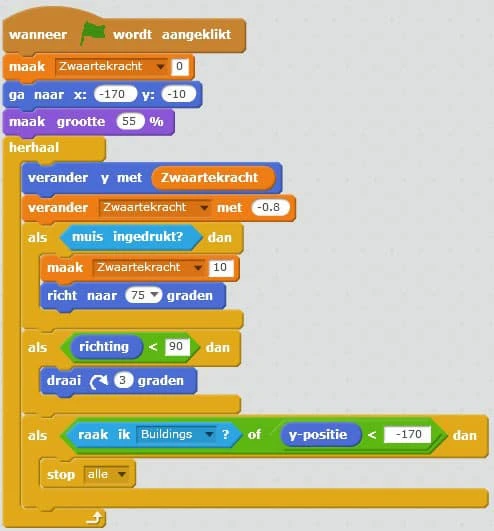
- Your code will look something like this (Figure 18).
- Test for yourself whether the code works.
- You will probably see the created variables on your screen. You can remove these by going to the variables header. Check the boxes next to the variable. Do this for your Sprite and obstacle.
6. Add background
Next to your created Sprites you will see the Playfield Background. Below the already created background you have the functions to create your own or choose one. Play around with this a bit.
7 Keeping Score
Go to your obstacle code.
- First we create a new variable, call it Score. You can use this for all sprites.
- The idea is that you get an extra point if the Sprite goes through the center of the obstacle.
- Go to Controls and grab an “if then” block. Place this temporarily on your screen.
- Then go to functions and grab a is greater than function and place it between the “if then”.
- Go to observe and grab the “X position of (your sprite name) block”. Place this function before > — between the “if then”
- In Observation, take the X position and place it after the >.
- Then you get the “change score by 1” variable from Data. And put it in the “if then” block.
- Then you place this block in the “repeat until” block. Under the “change X by”.
- For now, your code should look something like this (Figure 19).
If you test now you will see that the score goes up quickly, this is because the program quickly sees that the Sprite has gone through the obstacle. So it counts too long. We are going to make sure that it only adds 1 point.
- We create a new variable, we call this one: “already scored”. Select only for this Sprite and press OK.
- Go to Data and take the “make already scored” 0 block. Change the value 0 to: No
- Place this block at the beginning of the code under “appear”.
- Next you go to functions and grab your “and” block. And grab an “equals” block, place the equals block on the 2nd gap of the “and” block.
- Go to your variables and grab your “already scored” variable and place it on the — =.
- After the = you put: No
- Place the entire cup between the “if then”. Place this on the 1st opening of the and function. Put this series of commands back.
- Now the program checks if the Sprite has already scored. The program only has to add the score once. So we put a “make already scored” 0 from variables. Change the 0 to Yes. And put this between the if function. Under “change score by 1”.
- Your code should now look something like this (Figure 20).
- Test if your code works, you will probably see that the score goes up by 2. This is because both obstacles are counted.
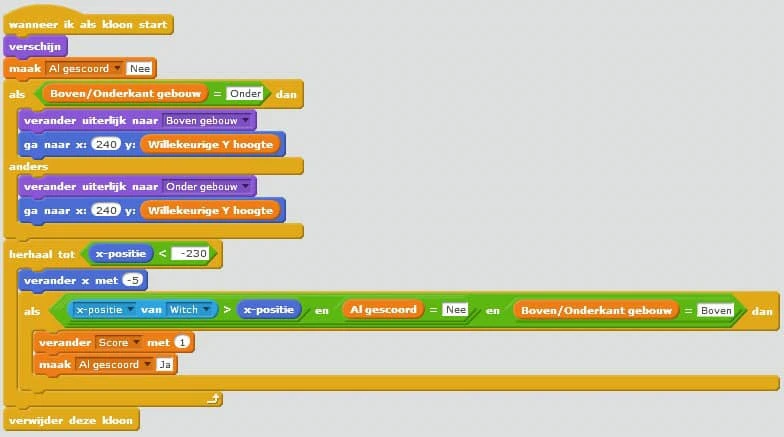
- We are going to indicate that only one obstacle (above or below) is counted for the score. We now make sure that only the top obstacle is counted.
- Go to functions and choose the "and" and equal block. Put the equal block in the last open spot of the "and" function.
- Place for =Bottom of the Top/Bottom building variable.
- Write to the = Above
- Drag the long code between “if then” into the open space of the “and” function.
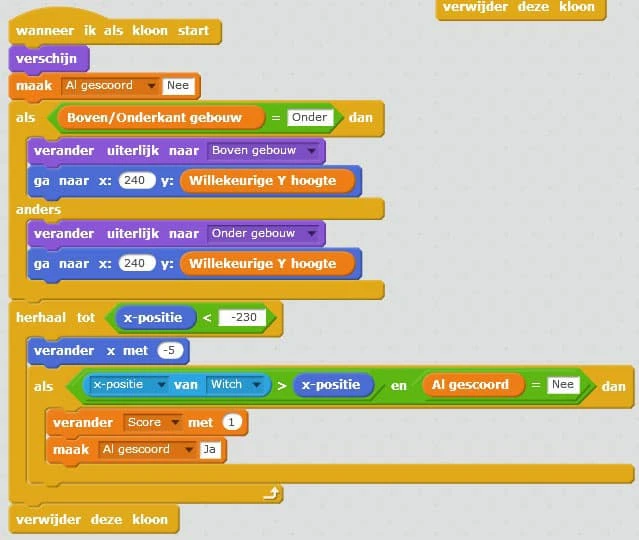
- After the =, change to Bottom.
- Drag the now long code next to the if function and place it before the and function. Then put it back in the same place.
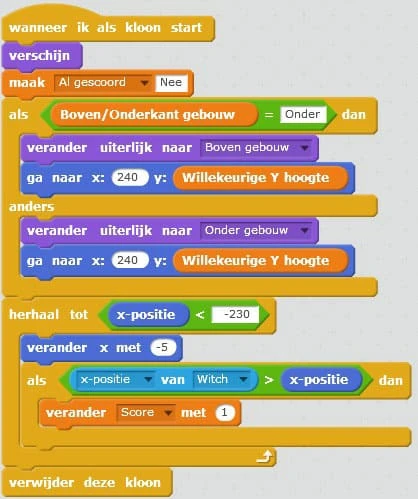
- Your code will look something like this (Figure 21).
- The code you wrote checks if the Sprite has passed the obstacle. It also checks if it has scored yet. And it checks if the Top/Bottom is equal to Top. This means that it only counts the top. If all of this is true, the score goes up by 1.
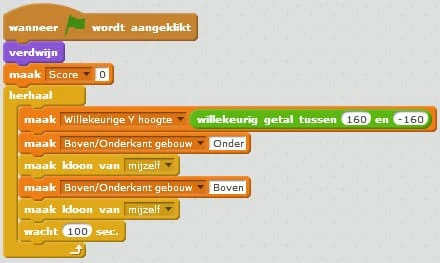
- You will see that the score does not reset when you start again. We change this by adding a variable before the start function (the flag). Make “score” 0 (picture 22).
- Now remove the Variable “already scored” from your screen by checking the box.
Now you have created your own Flappy Bird game! Did you enjoy creating it? You can still expand the game. For example, you can add music and sound effects, or create multiple characters. You have already created the basis of the game and now you can completely customize the game to your own wishes. Have fun!